Garbage Disposal Parts
Garbage disposals are now an essential part of any modern kitchen, making it easier to manage food waste and keep your kitchen clean and odor free. These are small, but effective machines that fit under your kitchen sink, and grind food waste so it can safely be sent down the drain. Yet, just like anything mechanical, they are comprised of many moving parts that must all be in harmony for it to work.
Knowing what type of parts are in your garbage disposal not only prevents unexpected breakdowns and repairs, but will also save you time and money when you do need to replace any parts or the entire thing. This complete guide will guide you through all the elements that make up an average garbage disposal, along with easy-to-understand explanations, tips to help you keep your unit running smoothly for years.
Garbage Disposal Parts Diagram
To clear things up about how a garbage disposal works, here’s a comprehensive diagram with an explanation for each part. These visuals give the user a visual map of where things are, and how things interact with each other.
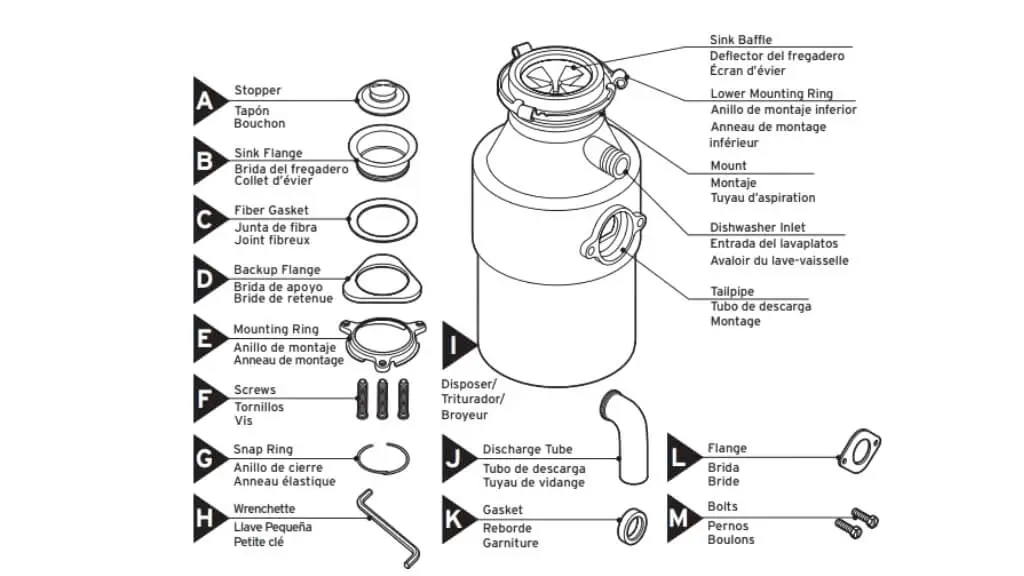
- Stopper (A): Fits into the sink drain to prevent unwanted objects from entering the disposal and can be used to hold water in the sink when needed.
- Sink Flange (B): The part that mounts directly to the bottom of the sink, acting as the interface between the sink and the garbage disposal.
- Fiber Gasket (C): Provides a seal between the sink flange and the sink to prevent leaks.
- Backup Flange (D): Sits beneath the sink flange to provide additional support and sealing capacity.
- Mounting Ring (E): Used to secure the garbage disposal to the sink flange assembly with screws, ensuring a tight fit and stable installation.
- Screws (F): Used to attach the mounting ring to the backup flange, securing the entire assembly to the sink.
- Snap Ring (G): Keeps the mounting ring securely in place, preventing it from loosening under the vibration of the disposal.
- Wrenchette (H): A small wrench specifically designed for manual unjamming and installation adjustments of the disposal.
- Discharge Tube (I): Channels the ground waste from the disposal unit to the drainage system.
- Lower Mounting Ring (J): Sits inside the garbage disposal to help align and secure the upper components like the discharge tube.
- Mount (K): Acts as a connector, holding components in place and aiding in the effective transfer of force from the motor to the grinding components.
- Dishwasher Inlet (L): Allows the dishwasher hose to connect to the garbage disposal, enabling food debris from the dishwasher to be processed by the disposal.
- Tailpipe (M): Connects the disposal’s discharge tube to the home’s plumbing system, ensuring seamless waste egress.
- Flange (N): Assists in the mounting and alignment of the garbage disposal under the sink.
- Bolts (O): Used for securing the flange to ensure a stable and secure installation of the disposal unit.
Main Components of a Garbage Disposal
Motor and Horsepower
The motor of the garbage disposal is the workhorse, driving gear assemblies that turn the impellers that spin the shredder ring, grinding up your food waste. The motor in most disposals usually starts at 1/3 HP for the casual user and goes up to 1 HP for the frequent user, or one that grinds a lot of hard scraps. The motor is also a key: From how well the unit can grind food waste to how well it can take on things like vegetable peels or small bones, the strength and size of the motor matter
Impellers and Flywheel
Food scraps are pulverized by the impellers and flywheel within the grinding chamber. The impellers are small, stubby arms mounted on the spinning flywheel. When the motor is switched on, the flywheel rotates at a high speed which in turn makes the impellers force the food waste against the shredder ring. Instead of sharp blades, processors with these impellers use centrifugal force and the grinding action of the shredder ring to reduce food to tiny particles.
Blades and Grinders
While you may hear the terms blades and grinders used to describe garbage disposals, most of today’s garbage disposals do not use blades but a “grinding ring” or “impellers” that grind food and other waste. Rather they use a grind plate and dull impellers to crush up and grind the food waste. The grinding mechanism is often made from a tough material such as stainless steel; it is capable of handling numerous grinds over the years.
Further Reading: What is a Garbage Disposal? The Ultimate Guide
Essential External and Mounting Parts of garbage disposal
Stopper
The stopper is a convenient way to keep food and water in your disposal unit while running the dishwasher. It’s intended function is to stop the drain from flowing into the disposal in order to hold water in the sink or prevent food from dropping into the disposal.
Sink Flange
The sink flange is the visible metal ring that is mounted in the drain hole of your sink. It is the attachment point of sink and garbage disposal, and seals the sink securely to avoid water leakage. The flange is usually anchored using gaskets, mounting rings, and screws. Because it’s wet, exposed to food scraps and cleaning agents, it’s vital that the sink flange be made of corrosion-resistant material such as stainless steel.
Fiber Gasket and Backup Flange
The fiber gasket & backup flange function as a sealing element between the sink flange and the disposal body to ensure a watertight seal. The fiber gasket is a soft, flexible rubber ring that rests between the flange and sink and a backup flange reinforces the sink’s involvement.
Mounting Ring and Snap Ring
The mounting ring and snap ring are metallic rings and provide an important role in anchoring the garbage disposal to the sink flange. The mounting ring is slipped over the flange and secured with screws or bolts, the snap ring secures the assembly. This system helps to keep the disposal steady during use to lessen vibrations and maintain a secure seal.
Bolts and Screws
Several bolts and screws are employed over the garbage disposal assemble to secure the several parts together. Such fasteners will enable the aperture to spread apart whenever the head is torqued but will maintain enough structural integrity so that grinding forces do not cause it to break apart. Over time, bolts and screws can become loose as a result of vibration or corrosion and it’s important to check them occasionally for tension, tightening or replacement. The right size and type of fastener may be the key to keep your disposal running right.
Bolts and Screws
Various bolts and screws are used throughout the garbage disposal assembly to hold the different parts together. These clips are made strong to withstand the forces generated during grinding. Screws and bolts can gradually loosen through the action of vibration or simply through corrosion, and it is therefore important to check on them periodically and to tighten or replace shoddily performing ones every so often.
Discharge and Plumbing Connections
Discharge Tube
The discharge tube is the pipe that connects the bottom of the garbage disposal to your home’s plumbing. Once food waste is ground in the disposal, it flows through the discharge tube and into the drainpipes. This pipe has to be connected and sealed well, no leaks must be allowed and dirty water has to pass smoothly.
Tailpipe
The tailpipe is a continuation of the discharge tube that connects the disposal to the drain line. It aids in guiding waste water and ground food particles down through the disposal and into your waste system or septic tank. The tailpipe is normally attached with a metal clamp or compression fitting to eliminate any possibility of leaks.
Dishwasher Inlet
Most garbage disposals will have a dishwater inlet, that is designed to transfer dishwater through the disposal. This capability helps the machine to smash any food particles from plates and other utensils before they enter the waterlines preventing clogs. The dishwasher inlet typically connects with a flex hose and utilizes a clamp. If you run a dishwasher, ensure the inlet is securely attached and the face is free of obstructions for peak results.
Further Reading: How To Connect Dishwasher Drain To Garbage Disposal
Preventive Maintenance Tips
Proper maintenance is the key to maintaining an efficient garbage disposal and preventing icky odors or slow drains. Here are some best practices:
- Regularly Clean it: To keep the disposal clean and fresh, grind up ice cubes with salt or baking soda and vinegar once a week.
- Remember What You Put In, When It Comes Out: Don’t put grease or oil or foods such as coffee grounds, eggshells, fibrous vegetables (like celery, corn husks or onion skins), or large bones down the disposal. These items can clog the blades or damage them.
- Use Cold Water: Remember to always keep a steady stream of cold water running BEFORE, DURING, and AFTER running the disposal. Cold water congeals any grease or oils, allowing them to be chopped up and flushed through.
- Clean with Citrus: Grinding small bits of lemon or orange peels can help reduce odors and cleanse the blades naturally.
Further Reading:
15 Things You Should Not Put Down Your Garbage Disposal
Why Your Garbage Disposal Allen Wrench Won’t Turn
How Many Amps Does a Garbage Disposal Use? Key Insights
Conclusion
For proper maintenance, troubleshooting or repair, understanding your garbage disposal parts is crucial. Learning all the parts and conducting periodic inspections will keep your disposal free from common problems, help it last longer, and keep everything on the kitchen front in shape. Whether you are interested in doing it yourself or just want to increase your awareness and know-how, this guide answers all your questions and provides the knowledge you need to successfully address whatever difficulty presents itself concerning your garbage disposal.
The Author

I’m Muhammad Nabeel Dar, an employee in waste management and the owner of Garbage Waste Disposal with more than four years of experience helping people to control waste and garbage disposals are the best tools to control it. Read more