do garbage disposals need an air gap ?
Garbage disposals do not require an air gap on their own. If you only have a garbage disposal under your sink and no dishwasher attached, you can skip this article. You don’t need anything extra.
The air gap issue only arises when the dishwasher drains through a garbage disposal, which is a common plumbing arrangement in most American kitchens. In that case, there must be some arrangement that prevents wastewater from flowing back from the garbage disposal into the dishwasher. This is accomplished either by an air gap device or by a high loop built into the drain hose. Which of these is needed in your kitchen depends on your area and the plumbing codes in effect there.
What an Air Gap Actually Is and How It Works
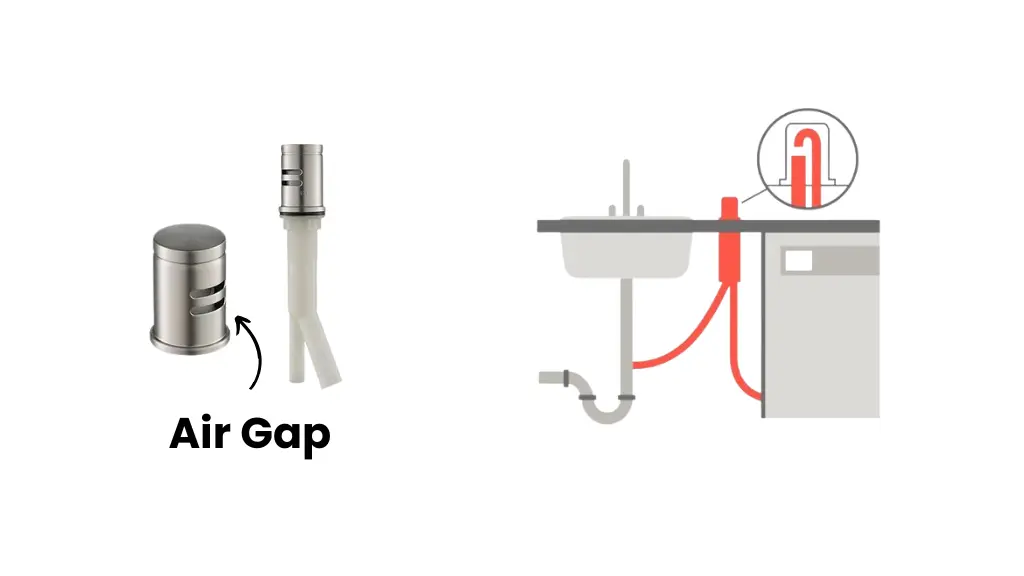
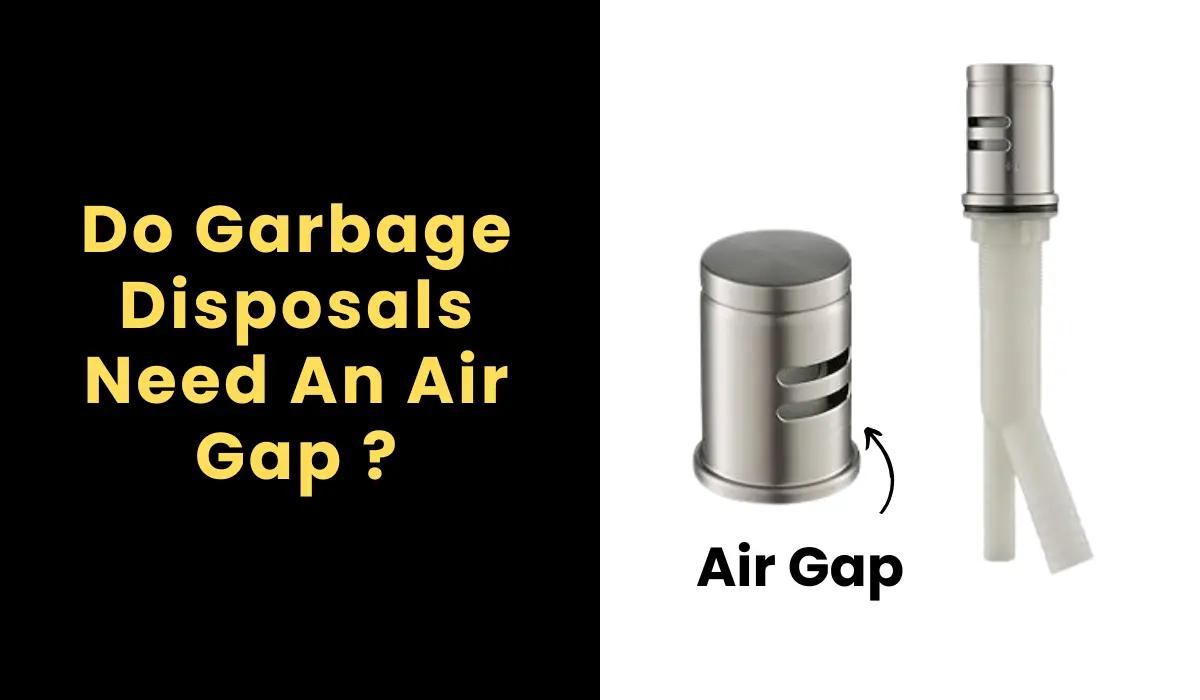
See that little chrome or brushed nickel cylinder next to your faucet on your countertop? That’s the air gap. Most homeowners don’t know what it’s for. Some people think of it as just a decorative feature, but it’s not.
Inside this cylinder, the dishwasher drain hose enters from the bottom. The water goes up through a thin tube, then passes through an air gap inside the device, and then down through a separate tube to connect to the dishwasher inlet on the garbage disposal. That air gap is the real purpose of the entire system. Water can’t go back through the air gap because it would have to rise up against gravity to do so.
If the drain line becomes blocked and water starts to back up, instead of going back into the dishwasher, it will leak out through the air gap cover and fall into the countertop or sink, where your clean dishes are kept safe.
A simple physics principle, perhaps not the most aesthetically pleasing device, is a highly effective solution to preventing contamination and cross-contamination.
Air Gap vs High Loop: Which One Do You Need
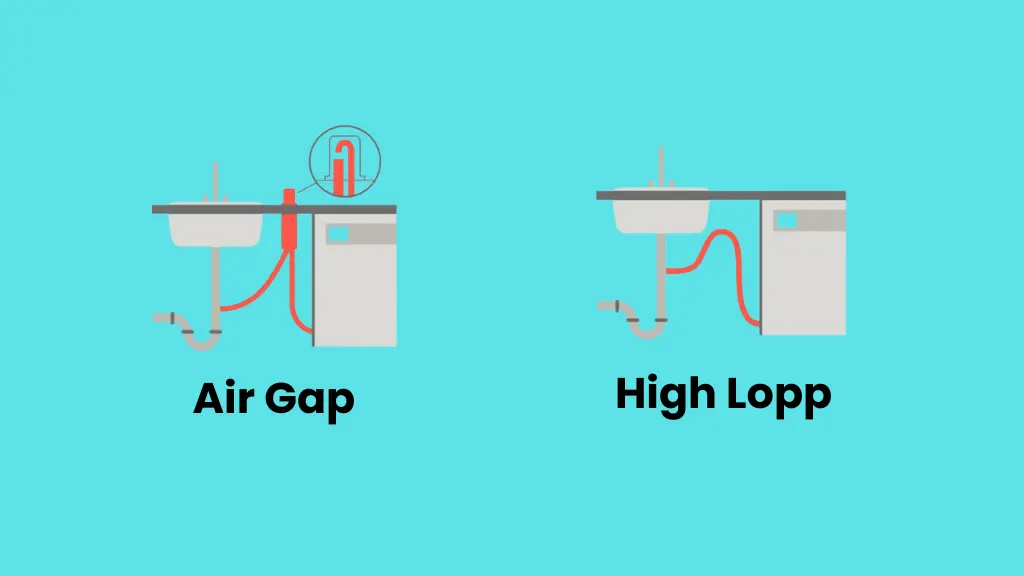
There are two methods used to prevent backflow of dirty water in a dishwasher, and the plumbing code in your area determines which method is acceptable.
An air gap device is installed on the edge of a countertop or sink and creates a clear and visible gap in the drain line. In this system, water actually leaves one drain, passes through an open air gap, and then enters another drain. There are no mechanical parts or electronic components that can fail. All the work is done by gravity and air alone. This is the method that is mandated by the Uniform Plumbing Code (UPC), and this code is enforced in many Western and Central American states, including California.
The High Loop is a relatively simple method. It involves running the dishwasher drain hose as high as possible under the countertop and then securing it to the top of the cabinet with a hose clamp or bracket. The hose then goes back down and connects to the dishwasher inlet on the garbage disposal. The idea is that if water starts to back up from the garbage disposal, it will have to climb above the height of the high loop to reach the dishwasher, which is unlikely under normal circumstances.
The International Plumbing Code (IPC), which is in effect in most of the eastern United States, recognizes the high loop as an acceptable alternative to an air gap.
| Method | Code | Reliability | Install | Visible |
|---|---|---|---|---|
| Air Gap Device | UPC (California, others) | Highest, physical break | Moderate, requires countertop hole | Yes |
| High Loop | IPC (most eastern states) | Good, but not absolute | Easy, hose and clamp | No |
Which method is better? Air Gap is considered the more reliable method. High Loop can fail over time if the hose bends, the clamp holding it in place becomes loose, or the height of the loop is not actually higher than the water level in the dishwasher when the water is being drained.
In contrast, an air gap is much less likely to fail because it has no mechanism that can fail. It works solely on the principle of air and gravity. Air does not leak, does not deteriorate, and does not require any maintenance.
If you have the option and an extra hole is available in your countertop or sink, an air gap is generally considered a safer and stronger choice, even in areas where a high loop is legally acceptable under the IPC (International Plumbing Code).
When You Specifically Need an Air Gap
If your jurisdiction enforces the UPC and your dishwasher drains through the garbage disposal, an air gap is mandatory. California is the most well-known UPC state and the one where inspectors enforce air gap requirements most consistently. A kitchen remodel or new dishwasher installation in California without a visible air gap device will fail plumbing inspection.
If your jurisdiction follows the IPC, you can use either an air gap or a high loop. Most homeowners in IPC states choose the high loop because it does not require a countertop hole and is invisible from above the sink.
Not sure which code applies to your area? Call your local building department. They can tell you in 30 seconds which plumbing code your jurisdiction has adopted and whether an air gap is required or optional for your specific setup.
No dishwasher at all? No air gap needed. The device exists solely to protect the dishwasher from backflow. A standalone garbage disposal with no dishwasher connection has no use for one.
How to Install a Dishwasher Air Gap to a Garbage Disposal
If you have confirmed that your setup needs an air gap, here is how to install one. The job takes 20 to 40 minutes with basic tools.
What you need
- Air gap kit (including the body, cap, and mounting hardware)
- 7/8-inch drill bit
- Power drill (only if there is no existing hole in the countertop)
- 5/8-inch drain hose (for connecting the dishwasher to the air gap)
- 7/8-inch drain hose (for connecting the air gap to the garbage disposal)
- Hose clamps
- Pliers
- Screwdriver
Locate or drill the countertop hole
Most sinks have a pre-punched knockout hole on the sink deck or countertop near the faucet for an air gap or soap dispenser. If one is available, pop out the knockout disc. If not, drill a 7/8″ hole through the countertop in a location that allows the hose routing to reach both the dishwasher and the disposal without sharp bends.
Mount the air gap body
Insert the air gap housing down through the hole from above. From underneath, slide the rubber washer and retaining nut onto the threaded body and tighten by hand, then snug with pliers. Do not overtighten on granite or stone countertops because the material can crack under point pressure.
Connect the dishwasher hose to the air gap inlet
The smaller branch on the air gap body (typically the 5/8″ side) connects to the hose coming from the dishwasher drain outlet. Slide the hose onto the branch and secure it with a hose clamp.
Connect the air gap outlet to the garbage disposal
The larger branch (7/8″ side) runs a hose down to the dishwasher inlet on the side of the garbage disposal. Before connecting, check whether the knockout plug inside the disposal’s dishwasher inlet has been removed. New disposals ship with this knockout in place, and failing to remove it before connecting the dishwasher hose is one of the most common installation mistakes. Remove it by inserting a screwdriver into the disposal through the drain opening and tapping the plug free with a hammer. Fish the loose plug out so it does not jam the grinding plate later.
Secure the hose to the disposal inlet
Slide the 7/8″ hose onto the disposal’s dishwasher inlet branch and clamp it with a hose clamp. Make sure the hose runs downhill from the air gap to the disposal with no dips or sags that could trap water.
Snap the decorative cap onto the air gap body
From above and run a dishwasher cycle to test the connections. Watch under the sink for leaks at every connection point during the drain cycle.
Common Air Gap Problems and What Causes Them
Water Spraying or Overflowing From the Air Gap Cap
Water spraying or overflowing from the air gap cap is the most frequent complaint. Nine times out of ten, the cause is a clog in the hose running from the air gap down to the disposal. Food debris, grease buildup, or a kinked hose restricts flow, and the water has nowhere to go except up through the cap. Disconnect the hose from the disposal inlet, clear the blockage, and reattach. If it keeps happening, the hose routing probably has a low spot that traps debris. Re-route it so it runs cleanly downhill.
Dishwasher Draining Slowly After Air Gap Installation
Slow dishwasher draining with an air gap installed usually points to the same hose blockage or to the disposal’s knockout plug still being in place. If the dishwasher drained fine before the air gap was installed and now drains slowly, check the knockout first. It is the most overlooked step in dishwasher-to-disposal connections.
Gurgling Noises During the Dishwasher Drain Cycle
Gurgling sounds during the drain cycle are normal with an air gap. Air is entering the system at the gap, which is exactly what the device is supposed to do. Loud persistent gurgling that was not there before may indicate a partial blockage developing in the outlet hose.
FAQ’s
The Author

Muhammad Nabeel Dar is the founder of GarbageWasteDisposal.com, where he researches and evaluates garbage disposals, kitchen sinks, dishwashers, and kitchen drain systems to help homeowners make confident buying decisions.
After analyzing 30+ garbage disposal models, multiple sink configurations, and a wide range of drain system components across brands like InSinkErator, Waste King, Moen, GE, Frigidaire, and KRAUS, he focuses on what actually matters: real-world performance, build quality, noise levels, installation ease, durability, and overall value.